
In the first part of this series on how to Optimize Your Website for Google Search, I focused on the on-page items which Google factors into your ranking well on the SERP (Search Engine Results Page). This part is all about the stuff you need to do on the backend to help with your rankings.
Just as important, some of this will be a benefit for your visitors as well in terms of the actual user experience. Indeed, Google just announced that a user’s page experience will be a significant ranking factor.
Add a Sitemap.xml File
It’s a best practice to create and maintain a sitemap.xml file for your website.
To be clear, I’m not talking about a web page on your site with links to all of your content. While that is often referred to as a sitemap, it’s a wholly different thing from the XML version.
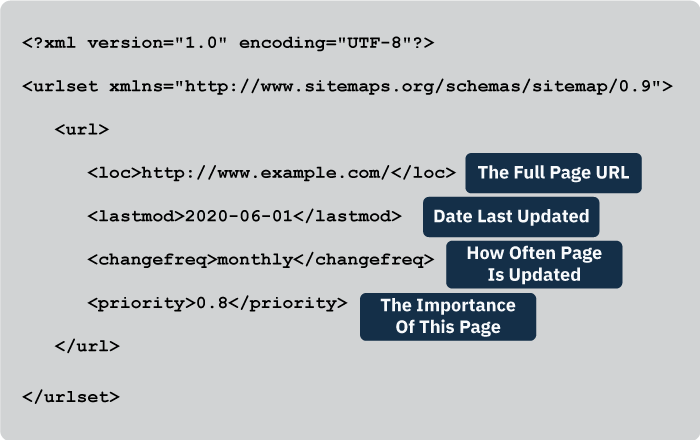
The sitemap.xml file is a specific type of file that goes into your site’s root directory, and typically never seen by your site’s visitors.
Instead, the XML file tells search engines like Bing and Google about the pages on your site that you want to rank. Beyond that, you can also prioritize certain pages over others, or even prevent others from being indexed at all.
Why would you want to block pages on your from ranking? There are a number of possible reasons, but just as an example, it’s not likely that you would want to drive organic traffic to your privacy policy or a terms of use page. Both are worth having, but neither is likely to be something you would want to have found via search.
All of that granular control can be had by creating and maintaining a sitemap.xml file.
Before you say, “I have no idea how to create an XML file,” have no fear. You can submit your URL at https://www.xml-sitemaps.com/, and it will generate one for you. You may need to edit it, but it will give you a solid place to start.
For WordPress users, it’s even easier. If you install and activate the Yoast SEO Plugin, it can create your sitemap.xml file automatically, and it will automatically update when you add new pages or posts to your site.
All of this is to help Google and Bing to understand your site structure and what you are prioritizing. Once created, be sure to submit your site map to Google and Bing to ensure it gets indexed as soon as possible.
Page Load Speeds
If there is a downside to WordPress and other CMS solutions, is that there is a vast array of plugins available for them. While plugins can absolutely provide crucial functionality to a website, it’s not unusual for those new to them to go a bit hog wild with adding them.
Each WordPress plugin is really just PHP code that gets added to the WordPress core at runtime. Each one you add will naturally impact the time it takes to fully load the page.
Some, like the Yoast SEO plugin or the Smushit plugin, are worth keeping, but you probably don’t need to add the ones which just add bells and whistles, but little meaningful functionality to your site.
Since page load times is a ranking factor, so the more you can do to make your pages as light as you can the better.
Optimize Your Images
I once inherited a website which was not ranking well. The content was solid, the layout was clean, but for some reason, the average page size was over fifteen megabytes. As the industry average is a little less than three megabytes, it was clear that the page size was a problem.
After reviewing site, it soon became apparent that the culprit was a row of photos near the footer on each page. While each photo was rendered at about 200 pixels wide, the actual photos were much larger than that. On average, each was over 4000 pixels wide.
Yes, you can upload a massive image, and then have it display at a smaller size, but the web browser still has to download that image no matter what size you intend to render it.
I would strongly encourage you to consider where and how you want that image to appear before uploading it. If it is a page header image, as an example, you could reduce it to no more than 1800 pixels wide. You may also want a smaller version for those mobile users, and use Cascading Style Sheets (CSS) to display that on mobile, in place of the larger one.
If the end goal is to have a series of images that will be presented at a specific size, like 600 pixels wide, then resize your image to be 600 pixels wide.
For myself, I do my resizing in Photoshop. There are a lot of options that allow me to find the best balance between file size and quality. For photos, I generally save them as .jpgs. For line art, charts, and diagrams, I usually save as a .png.
If Photoshop is not in your budget, you could try the freely available Gnu Image Manipulation Program, aka GIMP. It’s an open-source program, so you are free to download and use it without any cost.
If you’ve already uploaded a bunch of large images, and don’t have the time to redo all of them as suggested, there’s still hope – the WordPress plugin, Smushit, can help.
Smushit can optimize what you’ve already uploaded. The results are not going to be as refined as they would be with Photoshop, but it’s an option to explore if you don’t have the time or capability to resize in Photoshop or GIMP.
The free version limits you to 50 images per session, but you can just run a second set of 50 after the first batch completes.
If you want to do them all in one go, you can opt for the premium version.
Load Your Scripts and Styles Last
It’s likely you have some JavaScript on your pages. Like everything else, the more of those you load the longer it will take to render your content. Ideally, try to load those scripts after your content. If you can swing it, try to get them to load in the footer, not the header of your pages.
The same goes for your cascading style sheets. Try to get them to load after the content has loaded – prioritizing content over scripts and sheets will lower bounce rates and get people engaged in with your messaging, rather than getting annoyed waiting for the page to load.
Use Minification and Caching
Minification tools do what you might expect – they reduce the size of your source code and stylesheets by eliminating unneeded spacing. I will warn you, sometimes you’ll find it hard to edit your content with those turned on.
I quite like the Autoptimize minification plugin, but I totally freaked out when, after activating it, I couldn’t edit pages. Once I deactivated it, everything was fine, but do be wary if you use it.
There is much more to optimizing your website for SEO, but hopefully, you at least have a good place to get started. For more on SEO, I recommend that you visit the https://www.searchenginejournal.com/ website. They have a wealth of insight that can help you to enhance your SERP rankings.